108 Mbps Router & Wireless Access Point SpeedShare Turbo Pro
"108 Mbps Router & Wireless Access Point SpeedShare Turbo Pro" |  |
INTRODUCTION
At a first glance the TRUST router is easy to operate and configure BUT under heavy usage I found frequent disconnects. I then investigated the causes for this behaviour for quite a few days.
D-Link, TopCom and Kcomp sell the same router with a slightly different firmware and some different plastic container (well Kcomp router is exaclty built the same way as mine).
DIFFERENT FIRMWARES
There are plenty of firmwares avaiable to this router. Unfortunately the TRUST site has a old release that does not support XR (Extended Range). Other resellers firmware offer XR and superG mode.
POOR PERFORMANCE PROBLEMS
Analysing the wireless performance of the router we spot these problems:
1) The router after a reasonable "burst" (around 3 Mb/Sec) rolls back to a conservative sustained 300kb/sec
2) If the transfer is kept for a long time eventually the router disconnects and it is necessary a reset in order to be able to re-associate the router to the wireless card on the PC. This problem is reported also for the non wireless part on some P2P forums where users are complaining about resets using P2P Software.
SOLUTIONS
After going after a certified Atheros PCI card with SuperG and XR capabilities (48€) I was already rather pissed off. I have been blaming windows XP zero wireless connection service and Card drivers instead!
Now I am not suggesting that in order to solve your overheating problem you upgrade your router with a non certified firmware. That could invalidate your warranty. On the other hand the operation is quite reversible and looks innocent enought to me. Also with some exception the Kcomp firmware runs excently on my device giving improved performance. You could try this one as well from TOPCOM.
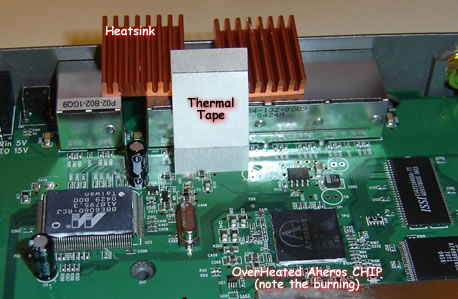
The first time I opened the router I couldn't help noticing that the engravings on the atheros chip where burnt and slightly brown. This could be due to two options:
 |
When I first put my finger on it I realised that it was the second instance. A termocouple measure showed up 57+ C° during operations on the controller CHIP. It needed some punishment and I needed some HeatSink and some Thermal Conductive Tape. And I had it from a Vantec ICEBERQ4 VGA Cooler. Need to say more? |
Note: Doing what I did will invalidate your warranty. Tech supports have a long tradition of ignoring real problems and getting all the blame on costumers. If you do stick a Heatsink on the chip you will give them a good reason.
I first tested if heat was the cause. And the results where astounding. With a heatsink and air blowing I could transfer large files for over one hour without any disconnection!!! Also the transfer speed topped over 5mb/sec (2 mb more than the previous record). Obviously overheating was the problem.
SOLVING OVERHEATING
I just used one of the thermal pads to secure one Heatsink to the Chip.

The Chip heatsinked - Problem solved.
I learn that I should not think it is always fault of WinXP and Bill Gates. Then I understood why CISCO equipment costs a arm and a leg. I already knew that forums are a good source of
postato da Enrico @ 21:51
4 Commenti
![]()
![]()

4 Commenti:
ciao...posso mettere sul trust un formware che mi permetta di utilizzarlo come WIRELESS REPEATER??? dovrei estendere il segnale della mia rete wireless....
grazie
Sinceramente non lo so. Mi sembra che sia molto difficile, prova a leggere sul pessimo manuale di istruzione e in bocca al lupo.
P.S. Gli extender che ho provato io non funzionavano comunque molto bene
in reltà c'è scritto questo...ma non riesco a capire...mi aiuti?
nel manuale scaricabile qui (http://drivers.trust.nl/manuals/getmanual.asp?file=/13/13643-it-pm.pdf)leggo:
12.3. Funzionamento solo come Access Point
Per offrire la maggiore flessibilità possibile, il prodotto può anche essere utilizzato come Access Point. Seguire la procedura solo nel caso almeno uno dei seguenti punti sia vero:
- La propria rete è già connessa a Internet mediante un firewall professionale dedicato, come ad esempio Watchguard Firebox.
- Si desidera aggiungere funzionalità wireless alla propria rete cablata, ma il collegamento a Internet non è (ancora) indispensabile.
- Si dispone già di un router per il collegamento a Internet. In questo caso, prendere in considerazione la sostituzione del router e l'utilizzo della funzione di router della Webstation.
- Il campo di una Webstation non è sufficiente, sono necessarie più Webstation per coprire l'area. Configurare la prima Webstation in modo normale, quindi quelle aggiuntive utilizzando le procedure descritte in questo capitolo.
Configurazione:
1. Riservare un indirizzo IP nella rete per ciascuna Webstation. Ogni altro dispositivo in rete non deve utilizzare questo indirizzo. Annotare l'indirizzo scelto. Individuare la maschera di sottorete della rete (qualcosa di simile a 255.255.0.0 o 255.255.255.0).
2. Verificare che siano disponibili sufficienti indirizzi IP liberi per i client wireless. È necessario un indirizzo per ciascun computer wireless.
3. Collegare la Webstation a un singolo computer (non collegarla ancora alla rete esistente).
4. Seguire le istruzioni riportate nei capitoli 5 e 6 per la configurazione (se non è stata già eseguita). Utilizzare una delle seguenti impostazioni:
− Non collegare nulla alla porta WAN.
− Configurare il computer (3) per ottenere automaticamente l'indirizzo IP (DHCP). Annotare le precedenti impostazioni presenti sul computer.
− Configurare il tipo di WAN: IP fisso, indirizzo IP casuale, pubblico, quale 211.20.1.1
− Impostare la crittografia wireless (almeno WEP a 128 bit oppure WPA-PSK). Impostare sempre la crittografia, a meno che la rete non sia al sicuro da attacchi esterni.
5. Aprire il menu LAN, impostazioni del server DHCP.
6. Impostare il server DHCP a "Disable".
7. Impostare l'indirizzo IP del dispositivo utilizzando l'indirizzo e la maschera di sottorete annotata in precedenza al passo (1).
8. Salvare le impostazioni e riavviare la Webstation.
9. Ripristinare le impostazioni di rete dei computer utilizzando le informazioni annotate al passo 4.
10. Collegare il computer e la Webstation alla rete.
11. Aprire nuovamente il menu di configurazione delle Webstation utilizzando il nuovo indirizzo IP. All'apertura della schermata di configurazione, l'operazione ha avuto successo. Se il menu non si apre e non è più possibile accedere alla Webstation, eseguire un reset (capitolo 10) e riprovare ad eseguire la configurazione.
Utilizzando un computer wireless, provare a connettersi alla rete. Questa procedura dovrebbe funzionare e dovrebbe essere possibile utilizzare tutte le funzioni di rete. È possibile utilizzare più di una Webstation nella rete per coprire un'area più estesa. Per attivare la funzionalità Roaming, accertarsi che il SSID sia lo stesso per tutte le Webstation.
Ho letto ora la richiesta. L'accesso da "Access Point" è chiaro per me.
In questa modalità il coso Trus fa solo da ripetitore wireless per la rete che c'è gia. In pratica serve solo quando il Router con il filo ce lo hai gia e vuoi una scatola che mandi il segnale Wi-Fi senza stare a assegnare gli IP ai computer che si connettono alla rete (Insomma a assegnare gli IP ci pensa il router fisso).
Posta un commento
Iscriviti a Commenti sul post [Atom]
<< Home page